January 22, 2018
I wanted to start the New Year (2018) by organizing an Emacs meetup session in the APAC time zone. Since there are a number of users in different cities, I thought a virtual session will be ideal. An online Google Hangout session was scheduled for Monday, January 15, 2018 at 1000 IST.
Although I announced the same only on Twitter and IRC (#emacs on irc.freenode.net), we had a number of Emacsers join the session. The chat log with the useful web links that were shared are provided below for reference.
We started our discussion on organizing Org files and maintaining TODO lists.
9:45 AM Suraj Ghimire: it is clear and loud :) video quality is good too
                       yes. is there any session today on hangouts ?
                       wow thats nice thanks you for introducing me to emacs :). I am happy emacs user
                       should we add bhavin and vharsh for more testing
                       oh you already shared :)

9:55 AM Suraj Ghimire:  working on some of my todos https://i.imgur.com/GBylmeQ.png
For few Vim users who wanted to try Emacs Org mode, it was suggested to get started with Spacemacs. Other project management and IRC tools with Emacs were also shared:
  HARSH VARDHAN can now join this call.
  HARSH VARDHAN joined group chat.
  Google Apps can now join this call.
  Google Apps joined group chat.

10:05 AM Shakthi Kannan: http://spacemacs.org/
                         https://github.com/ianxm/emacs-scrum
                         https://github.com/ianxm/emacs-scrum/blob/master/example-report.txt
                         https://www.emacswiki.org/emacs/CategoryWebBrowser
                         ERC for IRC chat
                         https://www.emacswiki.org/emacs/InternetRelayChat

10:13 AM Shakthi Kannan: https://github.com/skeeto/elfeed
                         https://www.emacswiki.org/emacs/EmacsMailingLists

10:18 AM Suraj Ghimire: I started using emacs after your session on emacs, before that i used to
                        get scared due to lot of shortcuts. I will work on improvements you told me.

10:19 AM Shakthi Kannan: M - Alt, C - Control
                         http://www.tldp.org/HOWTO/Emacs-Beginner-HOWTO-3.html

  Google Apps left group chat.
  Google Apps joined group chat.
  Sacha Chua can now join this call.
  Sacha Chua joined group chat.
We then discussed on key bindings, available modes, and reading material to learn and master Emacs:
10:27 AM Shakthi Kannan: http://shop.oreilly.com/product/9780596006488.do

10:31 AM Shakthi Kannan: https://www.masteringemacs.org/
                         http://shakthimaan.com/tags/emacs.html
                         http://shakthimaan.com/posts/2016/04/04/introduction-to-gnu-emacs/news.html

  Dhavan Vaidya can now join this call.
  Dhavan Vaidya joined group chat.
  Sacha Chua left group chat.

10:42 AM Shakthi Kannan: https://www.finseth.com/craft/
                         http://shop.oreilly.com/product/9781565922617.do

  Rajesh Deo can now join this call.
  Rajesh Deo joined group chat.
Users also wanted to know of language modes for Erlang:
10:52 AM Shakthi Kannan: http://www.lambdacat.com/post-modern-emacs-setup-for-erlang/

  HARSH VARDHAN left group chat.
  Aaron Hall can now join this call.

10:54 AM Shakthi Kannan: https://github.com/elixir-editors/emacs-elixir
Aaron Hall joined the channel and had few interesting questions. After an hour, we ended the call.
  Aaron Hall joined group chat.

10:54 AM Aaron Hall: hi!
10:54 AM Dhavan Vaidya: hi!

10:55 AM Aaron Hall: This is really cool!

Maikel Yugcha can now join this call.
Maikel Yugcha joined group chat.

10:57 AM Aaron Hall: Anyone here using Emacs as their window manager?

10:57 AM Suraj Ghimire: not yet :)

10:57 AM Shakthi Kannan: I am "mbuf" on IRC. http://stumpwm.github.io/

10:58 AM Aaron Hall: What about on servers? I just played around, but I like tmux for persistence and emacs inside of tmux.

10:59 AM Shakthi Kannan: https://github.com/pashinin/workgroups2

11:00 AM Aaron Hall: Is anyone compiling emacs from source?

Zsolt Botykai can now join this call.
Zsolt Botykai joined group chat.

11:00 AM Aaron Hall: yay, me too!

Zsolt Botykai left group chat.

11:00 AM Aaron Hall: it wasn't easy to start, the config options are hard
                     I had trouble especially with my fonts until I got my configure right

Maikel Yugcha left group chat.

11:03 AM Shakthi Kannan: https://github.com/shakthimaan/cask-dot-emacs

11:04 AM Aaron Hall anyone using Haskell? With orgmode? I've been having a lot of trouble with that...
                    code blocks are hard to get working
                    ghci
                    inferior?
                    not really sure
                    it's been a while since I worked on it
                    I had a polyglot file I was working on, I got a lot of languages working
                    Python, Bash, R, Javascript,
                    I got C working too

11:06 AM Shakthi Kannan: Rajesh: http://company-mode.github.io/

11:07 AM Aaron Hall: cheers, this was fun!

Aaron Hall left group chat.
Dhavan Vaidya left group chat.
Rajesh Deo left group chat.
Google Apps left group chat.
Suraj Ghimire left group chat.
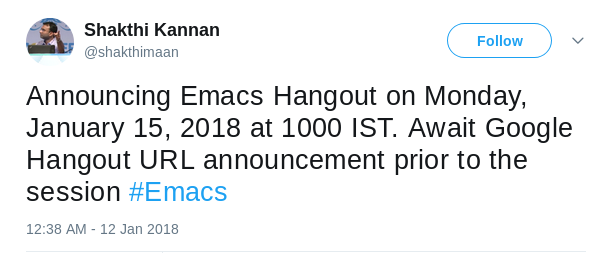
A screenshot of the Google Hangout session is shown below:
We can try a different online platform for the next meetup (Monday, February, 19, 2018). I would like to have the meetup on the third Monday of every month. Special thanks to Sacha Chua for her valuable inputs in organizing the online meetup session.
December 28, 2017
[Published in Open Source For You (OSFY) magazine, July 2017 edition.]
Introduction
In this fifth article in the DevOps series we will learn to install and set up Graphite using Ansible. Graphite is a monitoring tool that was written by Chris Davis in 2006. It has been released under the Apache 2.0 license and comprises three components:
- Graphite-Web
- Carbon
- Whisper
Graphite-Web is a Django application and provides a dashboard for monitoring. Carbon is a server that listens to time-series data, while Whisper is a database library for storing the data.
Setting it up
A CentOS 6.8 Virtual Machine (VM) running on KVM is used for the installation. Please make sure that the VM has access to the Internet. The Ansible version used on the host (Parabola GNU/Linux-libre x86_64) is 2.2.1.0. The ansible/ folder contains the following files:
ansible/inventory/kvm/inventory
ansible/playbooks/configuration/graphite.yml
ansible/playbooks/admin/uninstall-graphite.yml
The IP address of the guest CentOS 6.8 VM is added to the inventory file as shown below:
graphite ansible_host=192.168.122.120 ansible_connection=ssh ansible_user=root ansible_password=password
Also, add an entry for the graphite host in /etc/hosts file as indicated below:
192.168.122.120 graphite
Graphite
The playbook to install the Graphite server is given below:
---
- name: Install Graphite software
  hosts: graphite
  gather_facts: true
  tags: [graphite]

  tasks:
    - name: Import EPEL GPG key
      rpm_key:
        key: http://dl.fedoraproject.org/pub/epel/RPM-GPG-KEY-EPEL-6
        state: present

    - name: Add YUM repo
      yum_repository:
        name: epel
        description: EPEL YUM repo
        baseurl: https://dl.fedoraproject.org/pub/epel/$releasever/$basearch/
        gpgcheck: yes

    - name: Update the software package repository
      yum:
        name: '*'
        update_cache: yes

    - name: Install Graphite server
      package:
        name: "{{ item }}"
        state: latest
      with_items:
        - graphite-web
We first import the keys for the Extra Packages for Enterprise Linux (EPEL) repository and update the software package list. The ‘graphite-web’ package is then installed using Yum. The above playbook can be invoked using the following command:
$ ansible-playbook -i inventory/kvm/inventory playbooks/configuration/graphite.yml --tags "graphite"
MySQL
A backend database is required by Graphite. By default, the SQLite3 database is used, but we will install and use MySQL as shown below:
- name: Install MySQL
  hosts: graphite
  become: yes
  become_method: sudo
  gather_facts: true
  tags: [database]

  tasks:
    - name: Install database
      package:
        name: "{{ item }}"
        state: latest
      with_items:
        - mysql
        - mysql-server
        - MySQL-python
        - libselinux-python

    - name: Start mysqld server
      service:
        name: mysqld
        state: started

    - wait_for:
        port: 3306

    - name: Create graphite database user
      mysql_user:
        name: graphite
        password: graphite123
        priv: '*.*:ALL,GRANT'
        state: present

    - name: Create a database
      mysql_db:
        name: graphite
        state: present

    - name: Update database configuration
      blockinfile:
        path: /etc/graphite-web/local_settings.py
        block: |
          DATABASES = {
            'default': {
            'NAME': 'graphite',
            'ENGINE': 'django.db.backends.mysql',
            'USER': 'graphite',
            'PASSWORD': 'graphite123',
           }
          }

    - name: syncdb
      shell: /usr/lib/python2.6/site-packages/graphite/manage.py syncdb --noinput

    - name: Allow port 80
      shell: iptables -I INPUT -p tcp --dport 80 -m state --state NEW,ESTABLISHED -j ACCEPT

    - name:
      lineinfile:
        path: /etc/httpd/conf.d/graphite-web.conf
        insertafter: '           # Apache 2.2'
        line: '           Allow from all'

    - name: Start httpd server
      service:
        name: httpd
        state: started
As a first step, let’s install the required MySQL dependency packages and the server itself. We then start the server and wait for it to listen on port 3306. A graphite user and database is created for use with the Graphite Web application. For this example, the password is provided as plain text. In production, use an encrypted Ansible Vault password.
The database configuration file is then updated to use the MySQL credentials. Since Graphite is a Django application, the manage.py script with syncdb needs to be executed to create the necessary tables. We then allow port 80 through the firewall in order to view the Graphite dashboard. The graphite-web.conf file is updated to allow read access, and the Apache web server is started.
The above playbook can be invoked as follows:
$ ansible-playbook -i inventory/kvm/inventory playbooks/configuration/graphite.yml --tags "database"
Carbon and Whisper
The Carbon and Whisper Python bindings need to be installed before starting the carbon-cache script.
- name: Install Carbon and Whisper
  hosts: graphite
  become: yes
  become_method: sudo
  gather_facts: true
  tags: [carbon]

  tasks:
    - name: Install carbon and whisper
      package:
        name: "{{ item }}"
        state: latest
      with_items:
        - python-carbon
        - python-whisper

    - name: Start carbon-cache
      shell: /etc/init.d/carbon-cache start
The above playbook is invoked as follows:
$ ansible-playbook -i inventory/kvm/inventory playbooks/configuration/graphite.yml --tags "carbon"
Dashboard
You can open http://192.168.122.120 in the browser on the host to view the Graphite dashboard. A screenshot of the Graphite web application is shown below:
Uninstall
An uninstall script to remove the Graphite server and its dependency packages is required for administration. The Ansible playbook for the same is available in playbooks/admin folder and is given below:
---
- name: Uninstall Graphite and dependencies
  hosts: graphite
  gather_facts: true
  tags: [remove]

  tasks:
    - name: Stop the carbon-cache server
      shell: /etc/init.d/carbon-cache stop

    - name: Uninstall carbon and whisper
      package:
        name: "{{ item }}"
        state: absent
      with_items:
        - python-whisper
        - python-carbon

    - name: Stop httpd server
      service:
        name: httpd
        state: stopped

    - name: Stop mysqld server
      service:
        name: mysqld
        state: stopped

    - name: Uninstall database packages
      package:
        name: "{{ item }}"
        state: absent
      with_items:
        - libselinux-python
        - MySQL-python
        - mysql-server
        - mysql
        - graphite-web
The script can be invoked as follows:
$ ansible-playbook -i inventory/kvm/inventory playbooks/admin/uninstall-graphite.yml
References
Graphite documentation. https://graphite.readthedocs.io/en/latest/
Carbon. https://github.com/graphite-project/carbon
Whisper database. http://graphite.readthedocs.io/en/latest/whisper.html
December 1, 2017
[Published in Open Source For You (OSFY) magazine, June 2017 edition.]
Introduction
In this fourth article in the DevOps series, we will learn to install RabbitMQ using Ansible. RabbitMQ is a free and open source message broker system that supports a number of protocols such as the Advanced Message Queuing Protocol (AMQP), Streaming Text Oriented Messaging Protocol (STOMP) and Message Queue Telemetry Transport (MQTT). The software has support for a large number of client libraries for different programming languages. RabbitMQ is written using the Erlang programming language and is released under the Mozilla Public License.
Setting it up
A CentOS 6.8 virtual machine (VM) running on KVM is used for the installation. Do make sure that the VM has access to the Internet. The Ansible version used on the host (Parabola GNU/Linux-libre x86_64) is 2.2.1.0. The ansible/ folder contains the following files:
ansible/inventory/kvm/inventory
ansible/playbooks/configuration/rabbitmq.yml
ansible/playbooks/admin/uninstall-rabbitmq.yml
The IP address of the guest CentOS 6.8 VM is added to the inventory file as shown below:
rabbitmq ansible_host=192.168.122.161 ansible_connection=ssh ansible_user=root ansible_password=password
Also, add an entry for the rabbitmq host in the /etc/hosts file as indicated below:
192.168.122.161 rabbitmq
Installation
RabbitMQ requires the Erlang environment, and uses the Open Telecom Platform (OTP) framework. There are multiple sources for installing Erlang - the EPEL repository, Erlang Solutions, zero-dependency Erlang provided by RabbitMQ. In this article, we will use the EPEL repository for installing Erlang.
---
- name: Install RabbitMQ server
  hosts: rabbitmq
  gather_facts: true
  tags: [server]

  tasks:
    - name: Import EPEL GPG key
      rpm_key:
        key: http://dl.fedoraproject.org/pub/epel/RPM-GPG-KEY-EPEL-6
        state: present

    - name: Add YUM repo
      yum_repository:
        name: epel
        description: EPEL YUM repo
        baseurl: https://dl.fedoraproject.org/pub/epel/$releasever/$basearch/
        gpgcheck: yes

    - name: Update the software package repository
      yum:
        name: '*'
        update_cache: yes

    - name: Install RabbitMQ server
      package:
        name: "{{ item }}"
        state: latest
      with_items:
        - rabbitmq-server

    - name: Start the RabbitMQ server
      service:
        name: rabbitmq-server
        state: started

    - wait_for:
        port: 5672
After importing the EPEL GPG key and adding the EPEL repository to the system, the yum update command is executed. The RabbitMQ server and its dependencies are then installed. We wait for the RabbitMQ server to start and to listen on port 5672. The above playbook can be invoked as follows:
$ ansible-playbook -i inventory/kvm/inventory playbooks/configuration/rabbitmq.yml --tags "server"
Dashboard
The RabbitMQ management user interface (UI) is available through plugins.
- name: Start RabbitMQ Management UI
  hosts: rabbitmq
  gather_facts: true
  tags: [ui]

  tasks:
    - name: Start management UI
      command: /usr/lib/rabbitmq/bin/rabbitmq-plugins enable rabbitmq_management

    - name: Restart RabbitMQ server
      service:
        name: rabbitmq-server
        state: restarted

    - wait_for:
        port: 15672

    - name: Allow port 15672
      shell: iptables -I INPUT 5 -p tcp --dport 15672 -m state --state NEW,ESTABLISHED -j ACCEPT
After enabling the management plugin, the server needs to be restarted. Since we are running it inside the VM, we need to allow the management user interface (UI) port 15672 through the firewall. The playbook invocation to set up the management UI is given below:
$ ansible-playbook -i inventory/kvm/inventory playbooks/configuration/rabbitmq.yml --tags "ui"
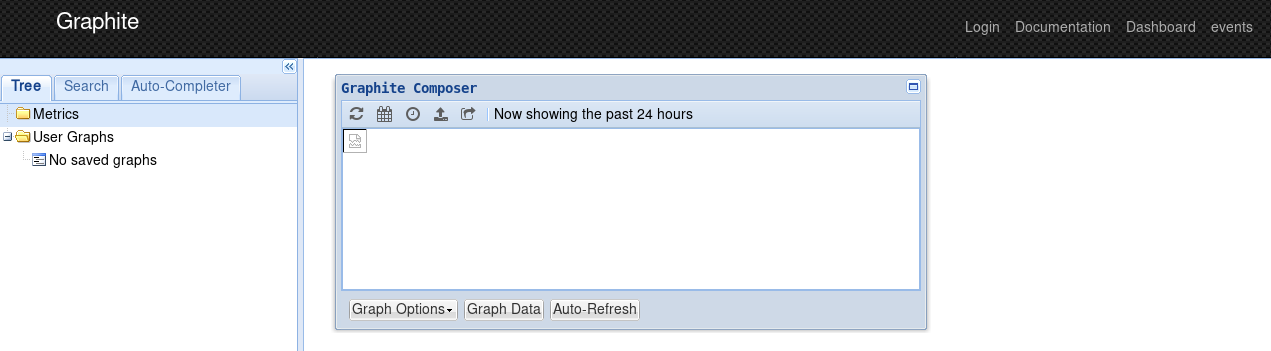
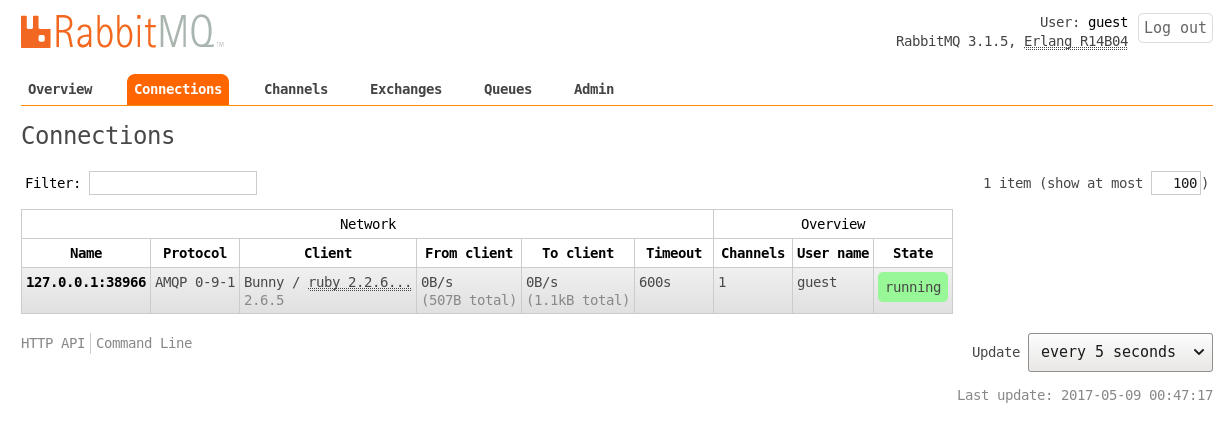
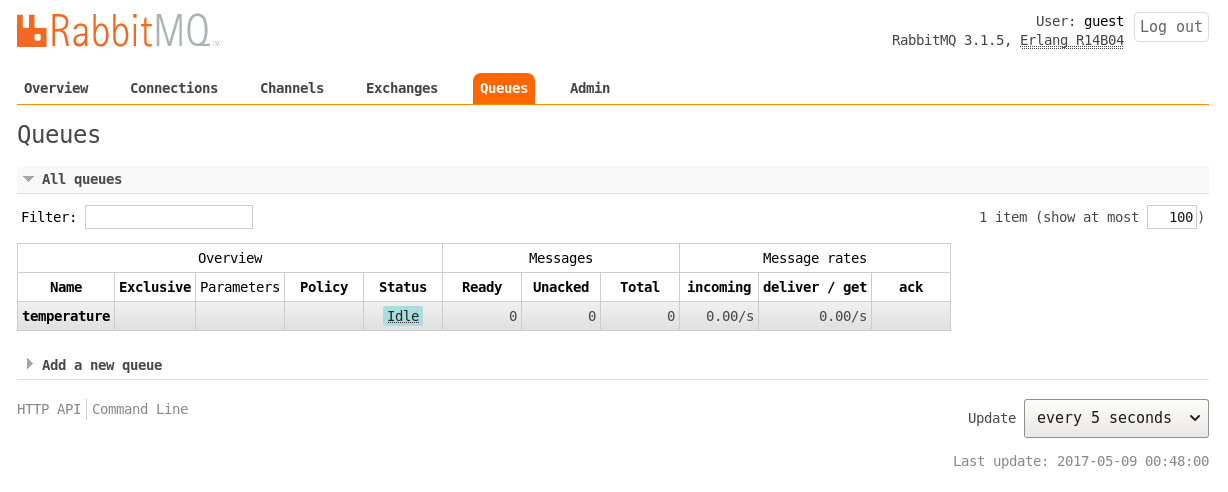
The default user name and password for the dashboard are ‘guest:guest’. From your host system, you can start a browser and open http://192.168.122.161:15672 to view the login page as shown in Figure 1. The default ‘Overview’ page is shown in Figure 2.

Ruby
We will use a Ruby client example to demonstrate that our installation of RabbitMQ is working fine. The Ruby Version Manager (RVM) will be used to install Ruby as shown below:
- name: Ruby client
  hosts: rabbitmq
  gather_facts: true
  tags: [ruby]

  tasks:
    - name: Import key
      command: gpg2 --keyserver hkp://keys.gnupg.net --recv-keys 409B6B1796C275462A1703113804BB82D39DC0E3

    - name: Install RVM
      shell: curl -sSL https://get.rvm.io | bash -s stable

    - name: Install Ruby
      shell: source /etc/profile.d/rvm.sh && rvm install ruby-2.2.6

    - name: Set default Ruby
      command: rvm alias create default ruby-2.2.6

    - name: Install bunny client
      shell: gem install bunny --version ">= 2.6.4"
After importing the required GPG keys, RVM and Ruby 2.2.6 are installed on the CentOS 6.8 VM. The bunny Ruby client for RabbitMQ is then installed. The Ansible playbook to setup Ruby is given below:
$ ansible-playbook -i inventory/kvm/inventory playbooks/configuration/rabbitmq.yml --tags "ruby"
We shall create a ‘temperature’ queue to send the values in Celsius. The consumer.rb code to receive the values from the queue is given below:
#!/usr/bin/env ruby

require "bunny"

conn = Bunny.new(:automatically_recover => false)
conn.start

chan  = conn.create_channel
queue = chan.queue("temperature")

begin
  puts " ... waiting. CTRL+C to exit"
  queue.subscribe(:block => true) do |info, properties, body|
    puts " Received #{body}"
  end
rescue Interrupt => _
  conn.close

  exit(0)
end
The producer.rb code to send a sample of five values in degree Celsius is as follows:
#!/usr/bin/env ruby

require "bunny"

conn = Bunny.new(:automatically_recover => false)
conn.start

chan   = conn.create_channel
queue   = chan.queue("temperature")

values = ["33.5", "35.2", "36.7", "37.0", "36.4"]

values.each do |v|
  chan.default_exchange.publish(v, :routing_key => queue.name)
end
puts "Sent five temperature values."

conn.close
As soon as you start the consumer, you will get the following output:
$ ruby consumer.rb
 ... waiting. CTRL+C to exit
You can then run the producer.rb script that writes the values to the queue:
$ ruby producer.rb

Sent five temperature values.
The received values at the consumer side are printed out as shown below:
$ ruby consumer.rb
 ... waiting. CTRL+C to exit
 Received 33.5
 Received 35.2
 Received 36.7
 Received 37.0
 Received 36.4
We can observe the available connections and the created queue in the management user interface as shown in Figure 3 and Figure 4, respectively.
Uninstall
It is good to have an uninstall script to remove the RabbitMQ server for administrative purposes. The Ansible playbook for the same is available in the playbooks/admin folder and is shown below:
---
- name: Uninstall RabbitMQ server
  hosts: rabbitmq
  gather_facts: true
  tags: [remove]

  tasks:
    - name: Stop the RabbitMQ server
      service:
        name: rabbitmq-server
        state: stopped

    - name: Uninstall rabbitmq
      package:
        name: "{{ item }}"
        state: absent
      with_items:
        - rabbitmq-server
The script can be invoked as follows:
$ ansible-playbook -i inventory/kvm/inventory playbooks/admin/uninstall-rabbitmq.yml
You are encouraged to read the detailed documentation at https://www.rabbitmq.com/documentation.html to know more about the usage, configuration, client libraries and plugins available for RabbitMQ.
November 20, 2017
[Published in Open Source For You (OSFY) magazine, May 2017 edition.]
Introduction
In this third article in the DevOps series, we will install and set up Cacti, a free and open source Web-based network monitoring and graphing tool, using Ansible. Cacti is written in PHP and uses the MySQL database as a backend. It uses the RRDtool (Round-Robin Database tool) to handle time series data and has built-in SNMP support. Cacti has been released under the GNU General Public License.
Setting up Cacti
We will use a CentOS 6.8 virtual machine (VM) running on KVM to setup Cacti. Just for this demonstration, we will disable SELinux. You will need to set the following in /etc/selinux/config and reboot the VM.
SELINUX=disabled
When using in production, it is essential that you enable SELinux. You should then test for Internet connectivity from within the VM.
The Ansible version used on the host Parabola GNU/Linux-libre x86_64 is 2.2.1.0. The ansible/inventory/kvm/ directory structure is shown below:
ansible/inventory/kvm/inventory
ansible/inventory/kvm/group_vars/all/all.yml
The IP address of the guest CentOS 6.8 VM is provided in the inventory file as shown below:
centos ansible_host=192.168.122.98 ansible_connection=ssh ansible_user=root ansible_password=password
Add an entry for ‘centos’ in the /etc/hosts file as indicated below:
192.168.122.98 centos
The contents of the all.yml for use with the playbook are as follows:
---
mysql_cacti_password_hash: "{{ vault_mysql_cacti_password_hash }}"

mysql_username: "{{ vault_mysql_user }}"
mysql_password: "{{ vault_mysql_password }}"
The cacti.yml playbook is located in the ansible/playbooks/configuration folder.
Vault
Ansible provides the Vault feature, which allows you to store sensitive information like passwords in encrypted files. You can set the EDITOR environment variable to the text editor of your choice, as shown below:
$ export EDITOR=nano
In order to store our MySQL database credentials, we will create a vault.yml file as indicated below:
$ ansible-vault create inventory/kvm/group_vars/all/vault.yml
Provide a password when prompted, following which, the Nano text editor will open. You can enter the following credentials and save the file.
---
vault_mysql_cacti_password_hash: "*528573A4E6FE4F3E8B455F2F060EB6F63ECBECAA"

vault_mysql_user: "cacti"
vault_mysql_password: "cacti123"
You can edit the same file, if you wish, using the following command:
$ ansible-vault edit inventory/kvm/group_vars/all/vault.yml
It will prompt you for a password, and on successful authentication, your text editor will open with the decrypted file contents for editing.
Apache
Cacti has many dependency packages, and the first software that we will install is the Apache HTTP server.
---
- name: Install web server
  hosts: centos
  gather_facts: true
  tags: [httpd]

  tasks:
    - name: Update the software package repository
      yum:
	name: '*'
	update_cache: yes

    - name: Install HTTP packages
      package:
	name: "{{ item }}"
	state: latest
      with_items:
	- wget
	- nano
	- httpd
	- httpd-devel

    - name: Start the httpd server
      service:
	name: httpd
	state: started

    - wait_for:
	port: 80
A ‘yum update’ is first performed to sync with the package repositories. The httpd Web server and a few other packages are then installed. The server is started, and the Ansible playbook waits for the server to listen on port 80.
MySQL and PHP
The MySQL, PHP and RRDTool packages are then installed, following which the SNMP and MySQL servers are started as shown below:
- name: Install MySQL, PHP packages
  hosts: centos
  become: yes
  become_method: sudo
  gather_facts: true
  tags: [database-web]

  tasks:
    - name: Install database/web packages
      package:
	name: "{{ item }}"
	state: latest
      with_items:
	- mysql
	- mysql-server
	- MySQL-python
	- php-mysql
	- php-pear
	- php-common
	- php-gd
	- php-devel
	- php
	- php-mbstring
	- php-cli
	- php-process
	- php-snmp
	- net-snmp-utils
	- net-snmp-libs
	- rrdtool

    - name: Start snmpd server
      service:
	name: snmpd
	state: started

    - name: Start mysqld server
      service:
	name: mysqld
	state: started

    - wait_for:
	port: 3306
Cacti
Cacti is available in the EPEL repository for CentOS. The GPG key for the CentOS repositories is enabled before installing the EPEL repository. A ‘yum update’ is performed and the Cacti package is installed. A ‘cacti’ user is then created in the MySQL database.
- name: Install Cacti
  hosts: centos
  become: yes
  become_method: sudo
  gather_facts: true
  tags: [cacti]

  tasks:
    - name: Import EPEL GPG key
      rpm_key:
	key: http://dl.fedoraproject.org/pub/epel/RPM-GPG-KEY-EPEL-6
	state: present

    - name: Add YUM repo
      yum_repository:
	name: epel
	description: EPEL YUM repo
	baseurl: https://dl.fedoraproject.org/pub/epel/$releasever/$basearch/
	gpgcheck: yes

    - name: Update the software package repository
      yum:
	name: '*'
	update_cache: yes

    - name: Install cacti
      package:
	name: "{{ item }}"
	state: latest
      with_items:
	- cacti

    - name: Create cacti database user
      mysql_user:
	name: cacti
	password: "{{ mysql_cacti_password_hash }}"
	encrypted: yes
	priv: '*.*:ALL,GRANT'
	state: present
Fixing a bug
The time zone data is missing in this MySQL version (5.1.73-8). In order to resolve this bug, the mysql_test_data_timezone.sql file needs to be imported and the ‘cacti’ user needs to be given the SELECT privilege to do this.
- name: For bug https://github.com/Cacti/cacti/issues/242
  hosts: centos
  become: yes
  become_method: sudo
  gather_facts: true
  tags: [bug]

  tasks:
    - name: Import mysql_test_data_timezone.sql
      mysql_db:
	state: import
	name: mysql
	target: /usr/share/mysql/mysql_test_data_timezone.sql

    - name: Grant privileges
      mysql_user:
	name: cacti
	append_privs: true
	priv: 'mysql.time_zone_name:SELECT'
	state: present
It is a good practice to have a separate playbook for such exceptional cases. In future, when you upgrade to newer versions that have bug fixes, you can simply skip this step.
Configuration
The last step involves configuring Cacti.
- name: Configuration
  hosts: centos
  become: yes
  become_method: sudo
  gather_facts: true
  tags: [config]

  tasks:
    - name: Create a database for cacti
      mysql_db:
	name: cacti
	state: present

    - name: Import cacti.sql
      mysql_db:
	state: import
	name: cacti
	target: /usr/share/doc/cacti-1.0.4/cacti.sql

    - name: Update database credentials in config file
      lineinfile:
	dest: /etc/cacti/db.php
	regexp: "{{ item.regexp }}"
	line: "{{ item.line }}"
      with_items:
	- { regexp: '^\$database_username', line: "$database_username = '{{ mysql_username }}';" }
	- { regexp: '^\$database_password', line: "$database_password = '{{ mysql_password }}';" }

    - name: Allow port 80
      shell: iptables -I INPUT 5 -p tcp --dport 80 -m state --state NEW,ESTABLISHED -j ACCEPT

    - name: Update access in cacti.conf for httpd
      replace:
	dest: /etc/httpd/conf.d/cacti.conf
	regexp: "{{ item.regexp }}"
	replace: "{{ item.replace }}"
      with_items:
	- { regexp: 'Require host localhost', replace: 'Require all granted' }
	- { regexp: 'Allow from localhost', replace: 'Allow from all' }

    - lineinfile:
	dest: /etc/cron.d/cacti
	regexp: '^#(.*)$'
	line: '\1'
	backrefs: yes

    - name: Start mysqld server
      service:
	name: mysqld
	state: restarted

    - wait_for:
	port: 3306

    - name: Start the httpd server
      service:
	name: httpd
	state: restarted

    - wait_for:
	port: 80
A database called ‘cacti’ is created for the application, and the cacti.sql file is imported into it. The database credentials are updated for the Cacti application. The firewall rules are then updated to allow incoming HTTP requests for port 80. The periodic cron poller is then enabled in /etc/cron.d/cacti:
*/5 * * * * cacti /usr/bin/php /usr/share/cacti/poller.php > /dev/null 2>&1
The MySQL and HTTP servers are then restarted.
The result
The entire playbook can now be invoked as follows:
$ ansible-playbook -i inventory/kvm/inventory playbooks/configuration/cacti.yml --ask-vault-pass
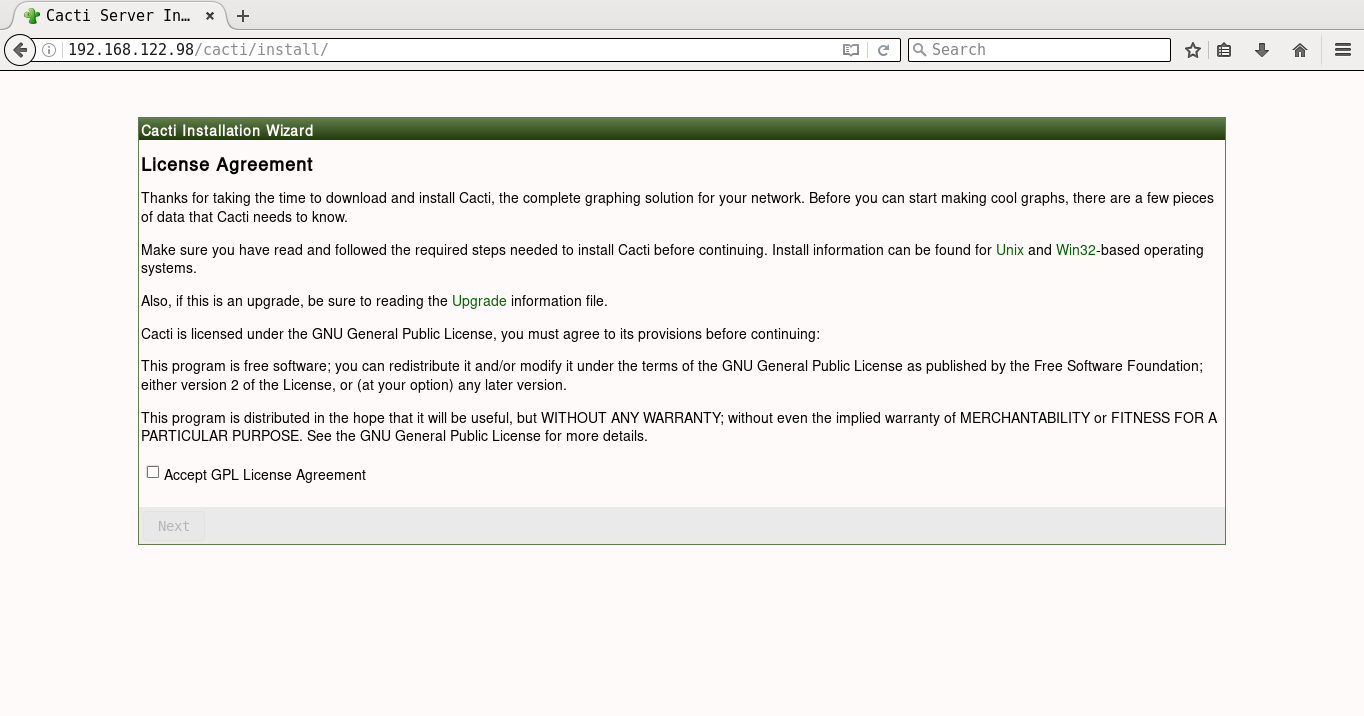
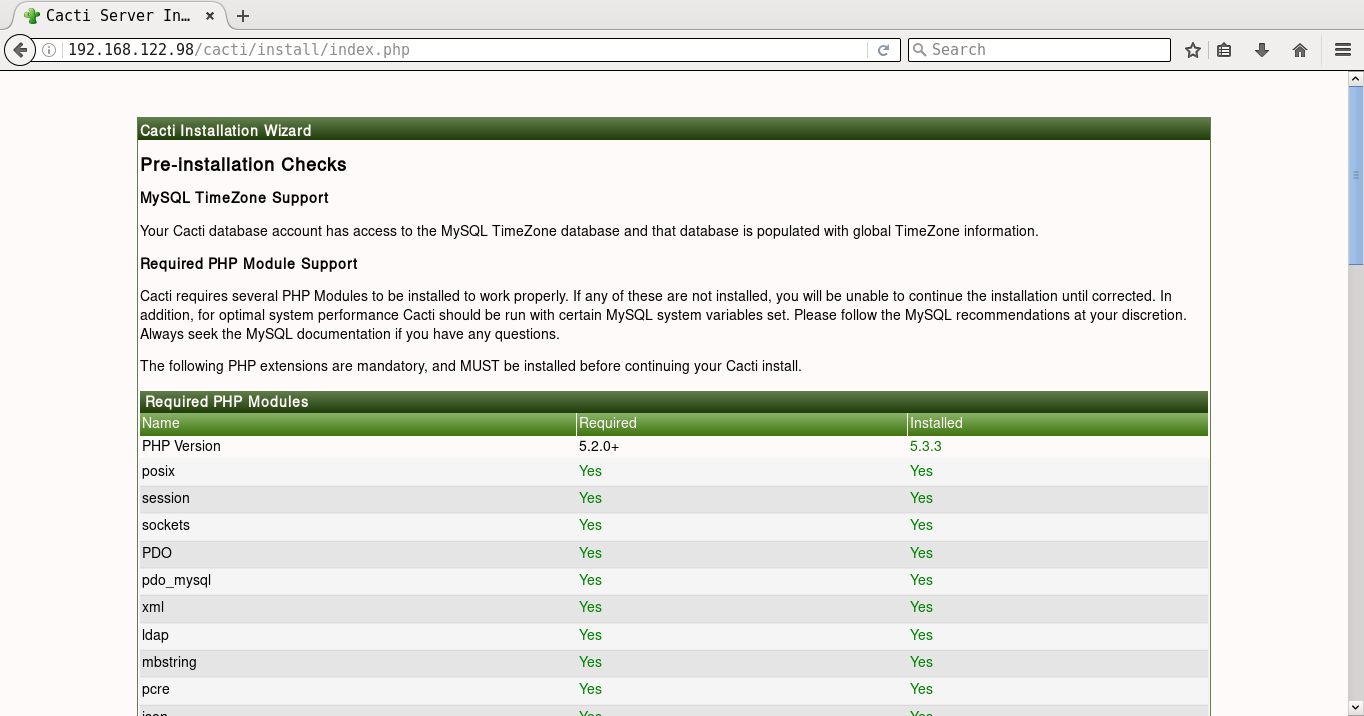
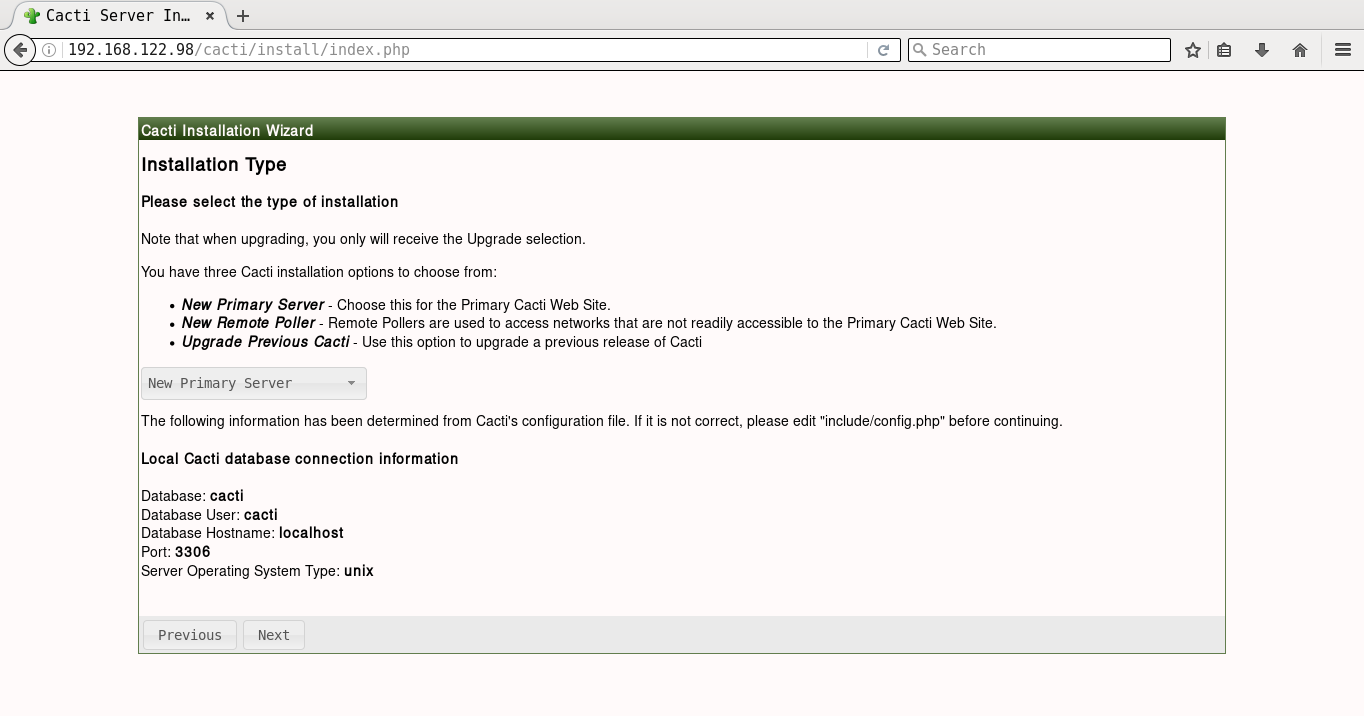
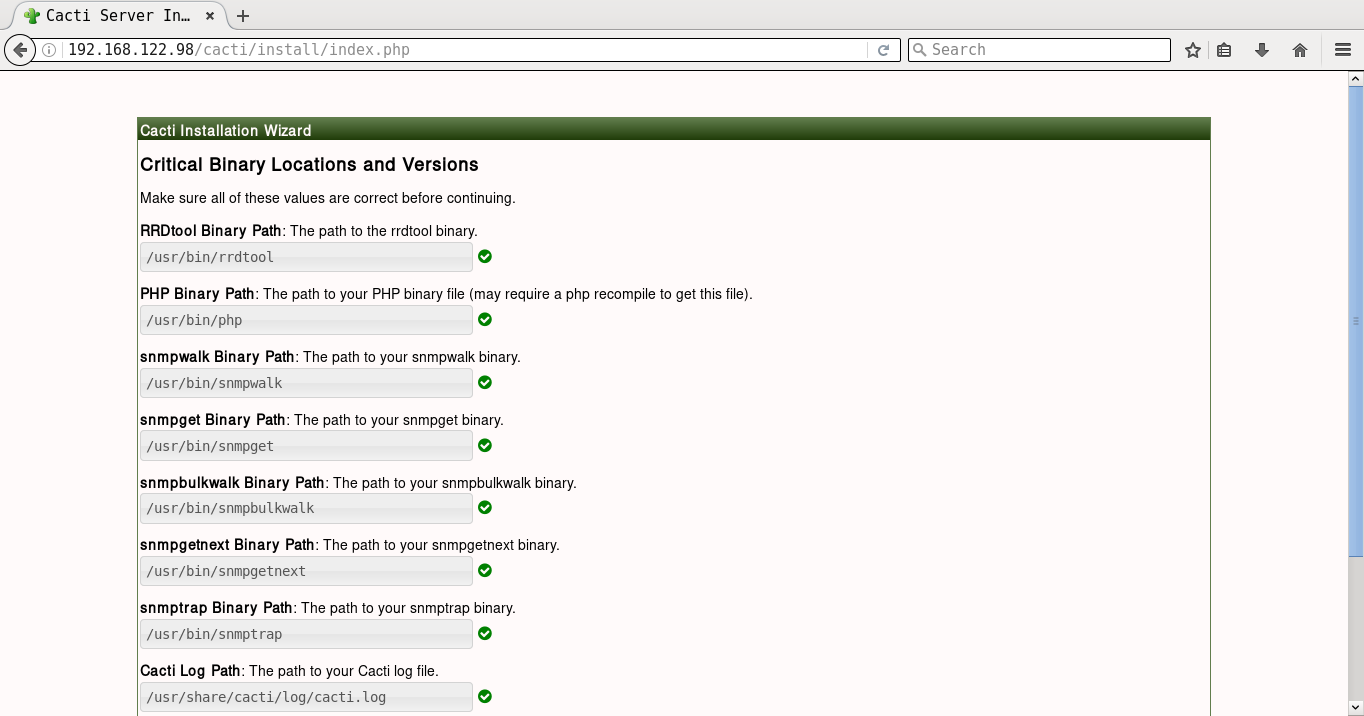
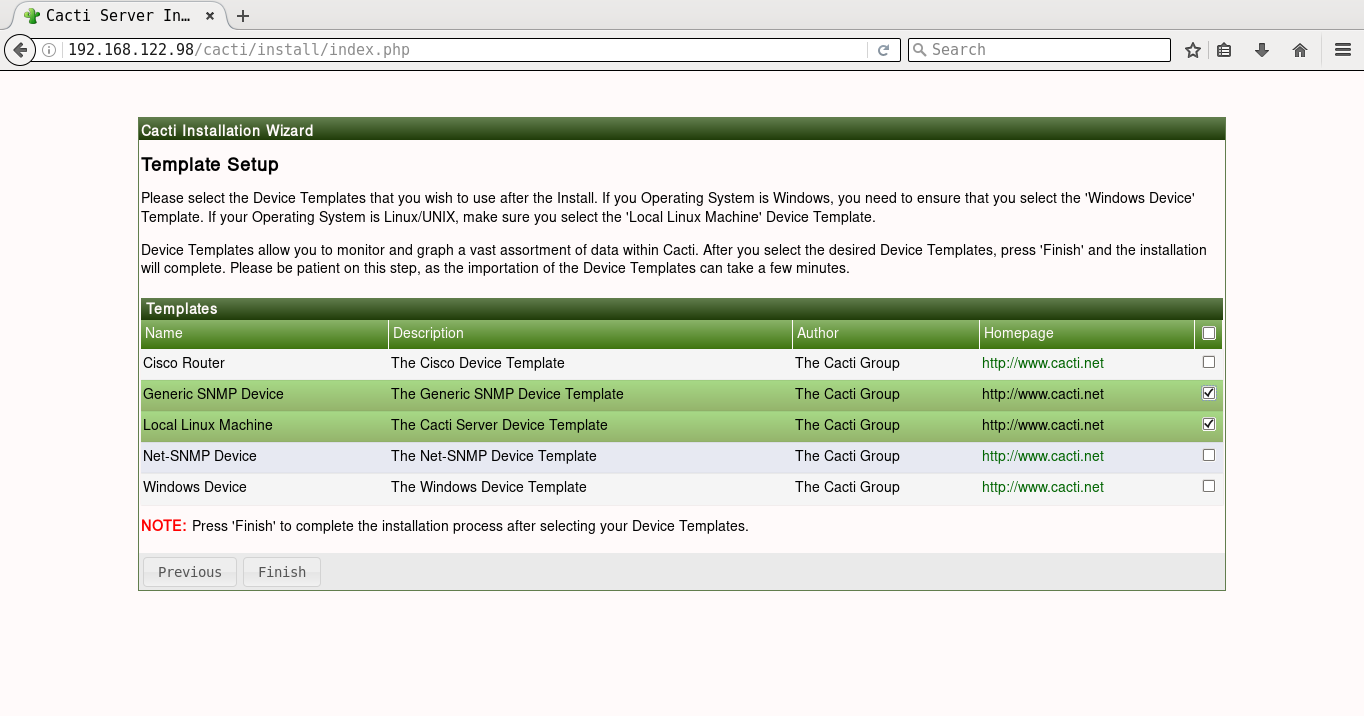
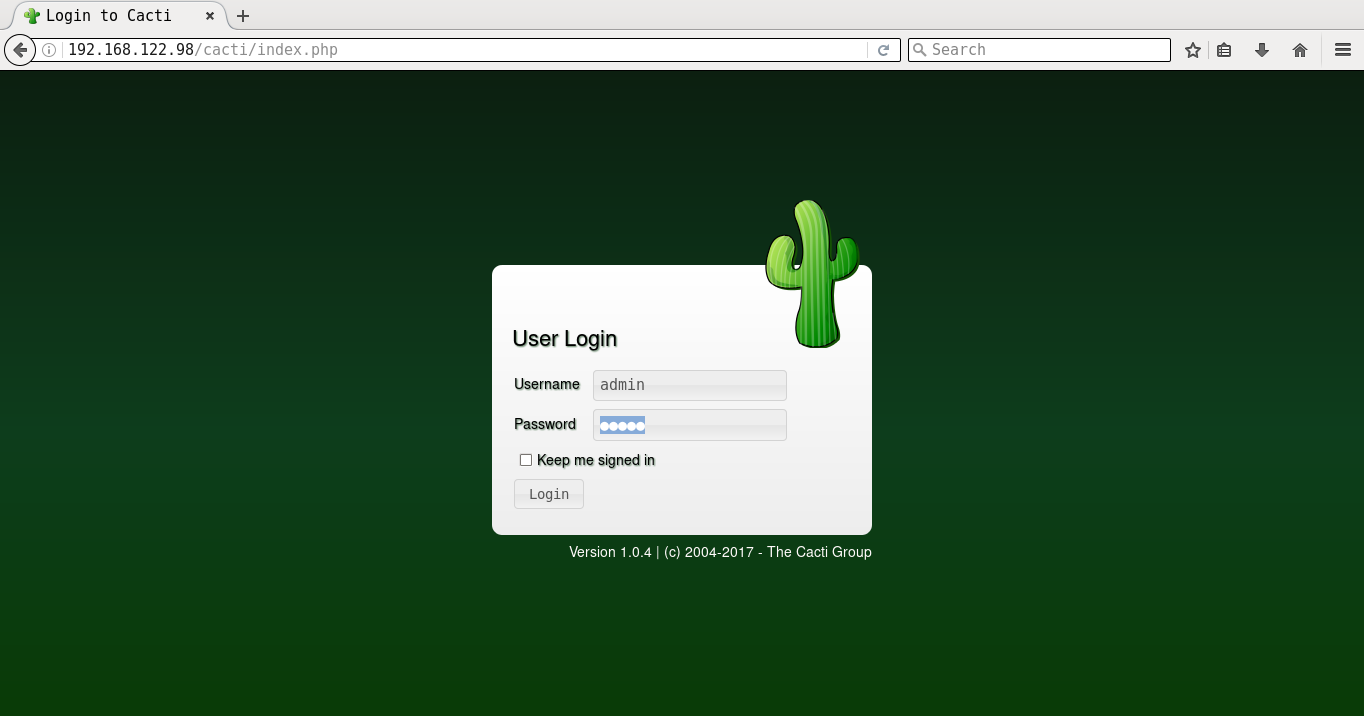
It will prompt you for the Vault password, following which all the playbooks will be completed. You can then open http://192.168.122.98/cacti to accept the GNU General Public License agreement. After you agree to the terms of the license, click ‘Next’. The Cacti installation wizard shows the pre-installation checks, which should not have any errors. This is followed by the selection of the installation type, binary location, version, and the directory permission checks. You can then decide on the templates you would like to set up, following which a user login is provided. The default user name and password is ‘admin:admin’, and you will be immediately prompted to change the password after logging in. You can then proceed to log in to the Cacti dashboard. Figures 1 to 8 give the screenshots of the Cacti Web UI installation for reference.


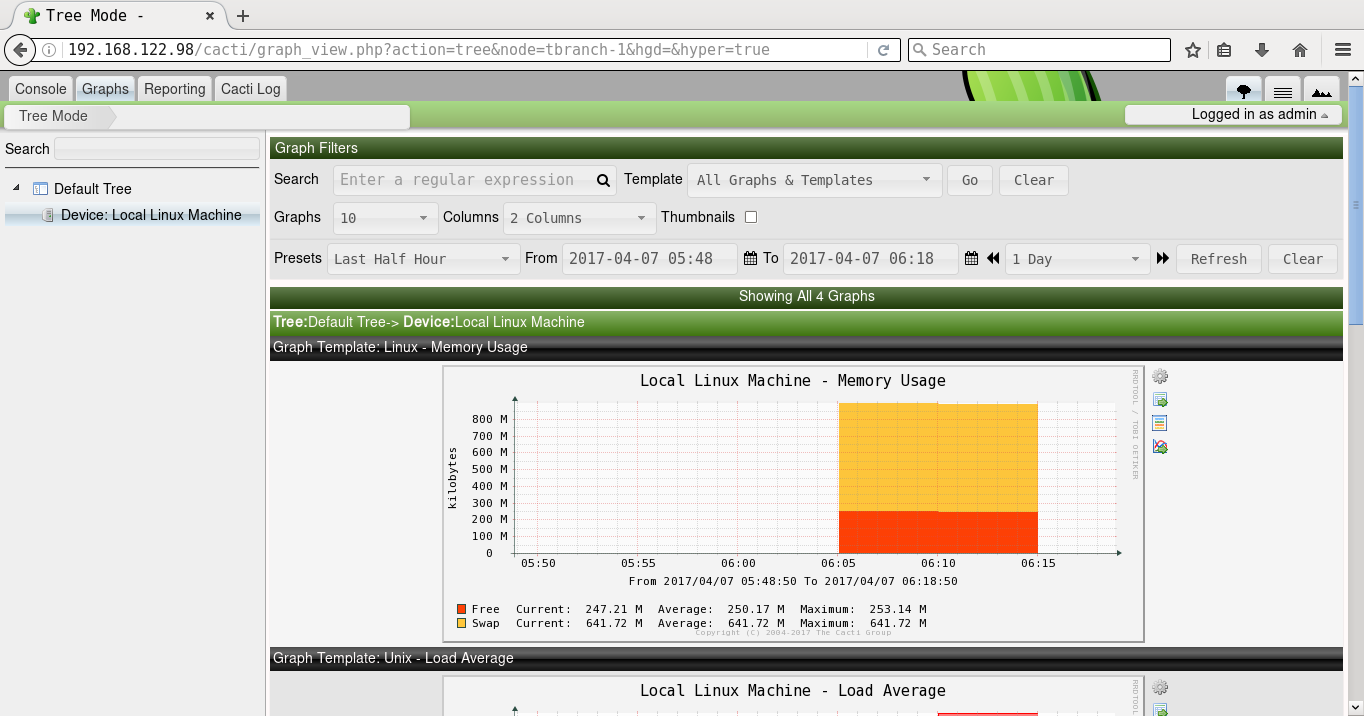
A screenshot of Cacti graphing for memory usage is shown in Figure 9.
October 30, 2017
Day 0
I arrived at Belgaum on Friday, October 13, 2017 morning by train, and headed to the Sankalp Bhumi resort. I was given the Rock Cottage Dhyan (“meditation”) for my stay. After freshening up and having breakfast, I started to explore the resort. The place was an abandoned stone quarry that has been converted into a beautiful resort spread over an area of eight acres. It is a very quiet, peaceful place with trees, lawns, and water bodies. A number of fellow hackers and mentors also started arriving at the venue, and we were just getting ready for the day’s events.

After lunch, we headed to the large function hall where volunteers were to be trained on soldering. Jithin B. P. had prepared a simple PCB layout with LEDs and potentiometers for volunteers to practice soldering. These volunteers will help school students in the soldering workshops in the coming two days at the event.

In the evening, I had suggested to Praveen Patil and Hitesh Dharmdasani to have an informal BoF session. So, everyone got together under one roof, and Hitesh explained how and why they started SHD. There were a round of introductions followed by open discussions. After dinner, some of our fellow hackers headed to the hackerspace (“cafeteria”) to test the Wi-Fi, and prepare for the next day’s hacks.
Day 1
The volunteers arrived in the morning to ready the registration desk and prepare the name cards. Science Hack Day banners were placed at various locations in the premises. After breakfast, everyone gathered at the function hall for an informal inauguration. This was followed by a 30-minute introduction on Aeromodelling by Mr. Arjun Bilawar (retired trainer, NCC Karnataka and Goa Directorate). It had rained heavily last evening and hence a nearby playground was not suitable to demo the aeroplane. Mr. Arjun then took us to a nearby open area, and with a short runway, he was able to lift off the model plane, and flew it for few minutes to the loud cheers from the students.

We then headed to the hackerspace to start work on our projects. Siddhesh and other hackers began to build a 3D printer. Shreyas K was building an image detector to be used in his college to detect students jumping off the wall in his college premises. This was covered in the news, Tarun Bharat.

Students from Kerala were working on a Bat detector. Few students were creating 3D artefacts using the 3D pen from reserved-bit. Hitesh Dharmdasani had brought his company’s (Informant Networks) Banana Pi based-router for hacking. Vaishali Thakkar was working on the Tessel board and Rust. I was setting up the Icoboard with Raspberry Pi 3 Model B to demonstrate chip design on free and open source hardware.
The school students were divided into two groups. One group attended the soldering workshop in the function hall, and the other group participated in the science toys workshop in an open arena. The groups will swap the workshops the following day. In another sit out area, biology students had brought specimens from the labs to showcase them. A team of architects were also creating a geodesic dome that can be used as a makerspace.
In the evening at 1830 IST, we had lightning talks, and I had presented the latest version of “Nursery Rhymes”. There were other interesting talks on embedded hardware, security, product design, mechanics of a bicycle, biogas etc. It was a long day!

Day 2
The second day of the event began with a video conferencing session with Science Hack Day, San Francisco. Their event was scheduled on October 14-15, 2017 at the GitHub office. Ariel Waldman used the webcam to show around their hackerspace. The students then headed to their respective soldering and science toys workshops. Some of the toys and experiments were from Arvind Gupta. The hackers at the makerspace continued working on their projects. All the hacks had to be completed by noon, as they have to be demoed and voted for in the evening.

After lunch, there was a rocket session where students launched rockets prepared by experts. We also had a group photo session, and headed to the function hall. All the hacks were presented to the students, and parents were also invited to attend the evening session. There was also an audience voting poll to choose their favourite science hack. After demonstrating the Icoboard, I had to rush to catch the train back to Bengaluru, so I did miss the closing ceremony.

My hearty congratulations to the organizers of Science Hack Day India 2017, Belgaum for a wonderful event that motivates students to learn and experiment with science.
I have uploaded over 80 photos during the trip to my new gallery. Do browse through them leisurely!
September 27, 2017
[Published in Open Source For You (OSFY) magazine, April 2017 edition.]
This is the second article in the DevOps series, and covers the installation of a (G/)LAMP stack and WordPress, using Ansible.
Introduction
In this article, we are going to learn how to automate the deployment of a (G/)LAMP stack and install WordPress. (G/)LAMP stands for GNU/Linux, Apache (a web server), MySQL (a database) and PHP (server-side scripting). It is a technology stack on which you can deploy different web applications. We are also going to explore the installation of WordPress, which is free and open source software for creating websites and blogs.
Linux
A Parabola GNU/Linux-libre x86_64 system is used as the host system. An Ubuntu 15.04 image runs as a guest OS using KVM/QEMU. Ansible is installed on the host system using the distribution package manager. You should be able to issue commands from Ansible to the guest OS. For example:
$ ansible ubuntu -m ping

ubuntu | SUCCESS => {
    "changed": false,
    "ping": "pong"
}
The /etc/hosts file already has an entry for the guest Ubuntu VM.
192.168.122.250 ubuntu
On the host system, we will create a project for our playbooks. It has the following directory structure:
ansible/inventory/kvm/
       /playbooks/configuration/
       /playbooks/admin/
An ‘inventory’ file is created inside the inventory/kvm folder that contains the following:
ubuntu ansible_host=192.168.122.250 ansible_connection=ssh ansible_user=xetex
Installing Apache
We will first install and test the Apache web server on the guest Ubuntu system. Let’s then create a playbooks/configuration/apache.yml file with the following content:
---
- name: Install Apache web server
  hosts: ubuntu
  become: yes
  become_method: sudo
  gather_facts: true
  tags: [web]

  tasks:
    - name: Update the software package repository
      apt:
	update_cache: yes

    - name: Install Apache
      package:
	name: "{{ item }}"
	state: latest
      with_items:
	- apache2

    - wait_for:
	port: 80
On the Ubuntu guest system, the playbook runs apt-get update and then installs the apache2 package. The playbook finishes after the server has started, and is listening on port 80. Open a terminal, enter the ansible/ folder, and execute the playbook as shown below:
$ ansible-playbook -i inventory/kvm/inventory playbooks/configuration/apache.yml -K
SUDO password:

PLAY [Install Apache web server] ***********************************************

TASK [setup] *******************************************************************
ok: [ubuntu]

TASK [Update the software package repository] **********************************
changed: [ubuntu]

TASK [Install Apache] **********************************************************
changed: [ubuntu] => (item=[u'apache2'])

TASK [wait_for] ****************************************************************
ok: [ubuntu]

PLAY RECAP *********************************************************************
ubuntu                     : ok=4    changed=2    unreachable=0    failed=0
The ’-K’ option is to prompt for the sudo password for the ‘xetex’ user. You can increase the level of verbosity in the Ansible output by passing ’-vvvv’ at the end of the ansible-playbook command. The more number of times ‘v’ occurs, the greater is the verbosity level.
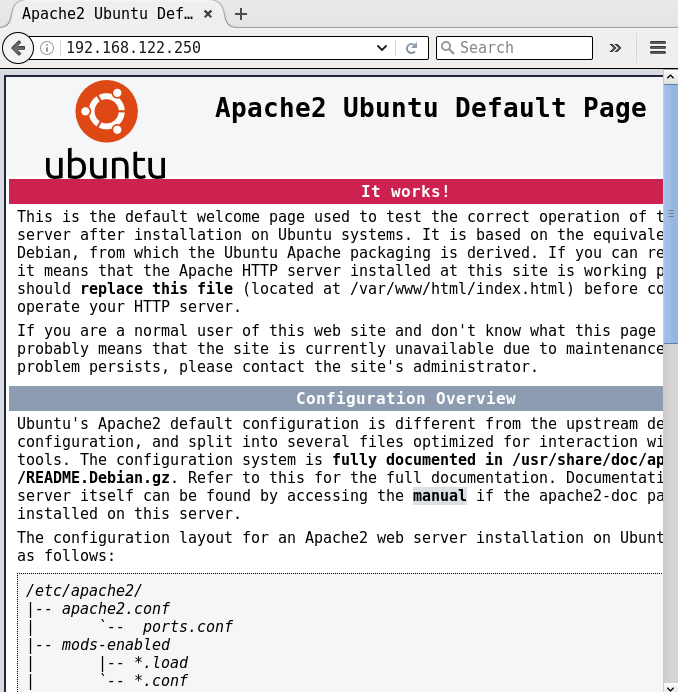
If you now open http://192.168.122.250, you should be able to see the default Apache2 index.html page as shown in Figure 1:
Installing MySQL
The next step is to install the MySQL database server. The corresponding playbook is provided below:
---
- name: Install MySQL database server
  hosts: ubuntu
  become: yes
  become_method: sudo
  gather_facts: true
  tags: [database]

  tasks:
    - name: Update the software package repository
      apt:
	update_cache: yes

    - name: Install MySQL
      package:
	name: "{{ item }}"
	state: latest
      with_items:
	- mysql-server
	- mysql-client
	- python-mysqldb

    - name: Start the server
      service:
	name: mysql
	state: started

    - wait_for:
	port: 3306

    - mysql_user:
	name: guest
	password: '*F7B659FE10CA9FAC576D358A16CC1BC646762FB2'
	encrypted: yes
	priv: '*.*:ALL,GRANT'
	state: present
The package repository is updated and the necessary MySQL packages are installed. The database server is then started, and we wait for the server to be up and running. A ‘guest’ user account with ‘osfy’ as the password is created for use in our web application. The chosen password is just for demonstration purposes. When used in production, please select a strong password with special characters and numerals.
You can compute the hash for a password from the MySQL client, as shown below:
mysql> SELECT PASSWORD('osfy');
+-------------------------------------------+
| PASSWORD('osfy')                          |
+-------------------------------------------+
| *F7B659FE10CA9FAC576D358A16CC1BC646762FB2 |
+-------------------------------------------+
1 row in set (0.00 sec)
An execution run to install MySQL is as follows:
$ ansible-playbook -i inventory/kvm/inventory playbooks/configuration/mysql.yml -K
SUDO password:

PLAY [Install MySQL database server] *******************************************

TASK [setup] *******************************************************************
ok: [ubuntu]

TASK [Update the software package repository] **********************************
changed: [ubuntu]

TASK [Install MySQL] ***********************************************************
changed: [ubuntu] => (item=[u'mysql-server', u'mysql-client', u'python-mysqldb'])

TASK [Start the server] ********************************************************
ok: [ubuntu]

TASK [wait_for] ****************************************************************
ok: [ubuntu]

TASK [mysql_user] **************************************************************
ok: [ubuntu]

PLAY RECAP *********************************************************************
ubuntu                     : ok=6    changed=2    unreachable=0    failed=0
Note: The default MySQL root password is empty. You should change it after installation.
Installing PHP
PHP is a server-side programming language and stands for PHP: Hypertext Preprocessor (a recursive acronym). Although we have used PHP5 in ths example, it is recommended that you use the latest PHP for security reasons. The Ansible playbook for installing PHP is given below:
---
- name: Install PHP
  hosts: ubuntu
  become: yes
  become_method: sudo
  gather_facts: true
  tags: [web]

  tasks:
    - name: Update the software package repository
      apt:
	update_cache: yes

    - name: Install PHP
      package:
	name: "{{ item }}"
	state: latest
      with_items:
	- php5
	- php5-mysql
We update the software repository and install PHP5. An execution output of the Ansible playbook is shown below:
$  ansible-playbook -i inventory/kvm/inventory playbooks/configuration/php.yml -K
SUDO password:

PLAY [Install PHP] *************************************************************

TASK [setup] *******************************************************************
ok: [ubuntu]

TASK [Update the software package repository] **********************************
changed: [ubuntu]

TASK [Install PHP] *************************************************************
changed: [ubuntu] => (item=[u'php5', u'php5-mysql'])

PLAY RECAP *********************************************************************
ubuntu                     : ok=3    changed=2    unreachable=0    failed=0
Installing WordPress
As a final step, we will download, install and set up WordPress. The complete playbook is as follows:
---
- name: Setup Wordpress
  hosts: ubuntu
  become: yes
  become_method: sudo
  gather_facts: true
  tags: [database]

  vars:
    wordpress_file: "/home/{{ ansible_user }}/Downloads/wordpress-latest.zip"
    wordpress_dest: "/var/www/html"

  tasks:
    - name: Update the software package repository
      apt:
	update_cache: yes

    - name: Create a database for wordpress
      mysql_db:
	name: wordpress
	state: present

    - name: Create downloads directory
      file:
	path: "/home/{{ ansible_user }}/Downloads"
	state: directory

    - name: Create target directory
      file:
	path: "{{ wordpress_dest }}/wordpress"
	state: directory

    - name: Download latest wordpress
      get_url:
	url: https://wordpress.org/latest.zip
	dest: "{{ wordpress_file }}"

    - name: Extract to /var/www/html
      unarchive:
	src: "{{ wordpress_file }}"
	dest: "{{ wordpress_dest}}"
	remote_src: True

    - name: Copy wp-config-sample.php to wp-config.php
      command: cp "{{ wordpress_dest }}/wordpress/wp-config-sample.php" "{{ wordpress_dest }}/wordpress/wp-config.php"

    - name: Update database credentials in the file
      replace:
	dest: "{{ wordpress_dest }}/wordpress/wp-config.php"
	regexp: "{{ item.regexp }}"
	replace: "{{ item.replace }}"
      with_items:
	- { regexp: 'database_name_here', replace: 'wordpress' }
	- { regexp: 'username_here', replace: 'guest' }
	- { regexp: 'password_here', replace: 'osfy'}

    - name: Restart apache2 server
      service:
	name: apache2
	state: restarted
We create variables to store the downloaded file for WordPress, and the target installation path. After updating the software repository, a database is created for the WordPress application. The download and target directories are created on the guest system, before actually downloading the latest WordPress sources. A configuration file is then created, and the database settings are updated. Although we explicitly specify the password here, the recommended practice is to store the encrypted passwords in an Ansible Vault file, and reference the same in the playbook. In future articles, I will demonstrate this use case. After completing the configuration, the web server is restarted. An execution run of the playbook is shown below:
 $  ansible-playbook -i inventory/kvm/inventory playbooks/configuration/wordpress.yml -K
SUDO password:

PLAY [Setup Wordpress] *********************************************************

TASK [setup] *******************************************************************
ok: [ubuntu]

TASK [Update the software package repository] **********************************
changed: [ubuntu]

TASK [Create a database for wordpress] *****************************************
changed: [ubuntu]

TASK [Create downloads directory] **********************************************
ok: [ubuntu]

TASK [Create target directory] *************************************************
changed: [ubuntu]

TASK [Download latest wordpress] ***********************************************
ok: [ubuntu]

TASK [Extract to /var/www/html] ************************************************
changed: [ubuntu]

TASK [Copy wp-config-sample.php to wp-config.php] ******************************
changed: [ubuntu]

TASK [Update database credentials in the file] *********************************
changed: [ubuntu] => (item={u'regexp': u'database_name_here', u'replace': u'wordpress'})
changed: [ubuntu] => (item={u'regexp': u'username_here', u'replace': u'guest'})
changed: [ubuntu] => (item={u'regexp': u'password_here', u'replace': u'osfy'})

TASK [Restart apache2 server] **************************************************
changed: [ubuntu]

PLAY RECAP *********************************************************************
ubuntu                     : ok=10   changed=7    unreachable=0    failed=0
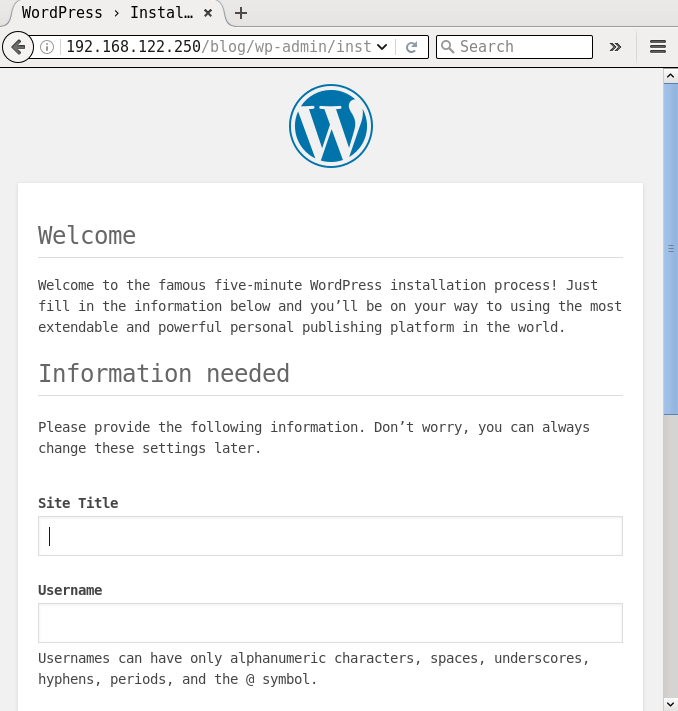
If you open the URL http://192.168.122.250/wordpress in a browser on the host system, you will see a screenshot as shown in Figure 2:
You can now proceed to complete the installation process from the browser. It is recommended that you follow the security best practices as recommended by the WordPress and PHP projects to harden this deployment.
Writing clean-up playbooks
It is essential to write clean-up playbooks to revert whatever changes you have made, so that you can roll back the system if things fail. Uninstalling should be done in the reverse order. For example, remove WordPress first, followed by PHP, MySQL and Apache.
The removal of WordPress could depend on your data retention policy. You might want to backup your PHP files, or you may decide to discard them. You might also want to retain the database. A complete removal of WordPress and the (G/)LAMP stack in the playbooks/admin folder is provided below for reference:
---
- name: Uninstall Wordpress
  hosts: ubuntu
  become: yes
  become_method: sudo
  gather_facts: true
  tags: [web]

  vars:
    wordpress_dest: "/var/www/html"

  tasks:
    - name: Delete wordpress folder
      file:
	path: "{{ wordpress_dest }}/wordpress"
	state: absent

    - name: Drop database
      mysql_db:
	name: wordpress
	state: absent

---
- name: Uninstall PHP
  hosts: ubuntu
  become: yes
  become_method: sudo
  gather_facts: true
  tags: [web]

  tasks:
    - name: Uninstall PHP packages
      package:
	name: "{{ item }}"
	state: absent
      with_items:
	- php5-mysql
	- php5

---
- name: Uninstall MySQL
  hosts: ubuntu
  become: yes
  become_method: sudo
  gather_facts: true
  tags: [database]

  tasks:
    - name: Stop the database server
      service:
	name: mysql
	state: stopped

    - name: Uninstall MySQL packages
      package:
	name: "{{ item }}"
	state: absent
      with_items:
	- python-mysqldb
	- mysql-client
	- mysql-server

---
- name: Uninstall Apache web server
  hosts: ubuntu
  become: yes
  become_method: sudo
  gather_facts: true
  tags: [server]

  tasks:
    - name: Stop the web server
      service:
	name: apache2
	state: stopped

    - name: Uninstall apache2
      package:
	name: "{{ item }}"
	state: absent
      with_items:
	- apache2
The entire suite of playbooks is also available in my GitHub project ( https://github.com/shakthimaan/introduction-to-ansible ) for your reference.
September 5, 2017
[Published in Open Source For You (OSFY) magazine, March 2017 edition.]
With this article, we begin a new series on DevOps, starting out with Ansible, which helps you to build a strong foundation. As the Ansible website proclaims, proudly, “Deploy apps. Manage systems. Crush complexity.”
Introduction
Ansible is an IT automation tool that is used for provisioning, configuration, deployment and managing infrastructure. The project was first released in 2012, and is written in Python. The main objective of the tool is to be simple and easy to use. It is based on an agent-less (push-based) architecture, and the playbooks are written in plain English. Today, it also supports pull-based deployments. Ansible uses SSH to execute commands on remote machines. It is available under the GNU General Public License.
Installation
You can install Ansible using your GNU/Linux distribution package manager.
On Fedora, you can use Yum to install Ansible, as follows:
$ sudo yum install ansible
If you are using RHEL or CentOS, install the epel-release, and then use the Yum command to install Ansible.
On Ubuntu, you need to add the ppa repository before installing the tool, as shown below:
$ sudo apt-get install software-properties-common
$ sudo apt-add-repository ppa:ansible/ansible

$ sudo apt-get update
$ sudo apt-get install ansible
The Ansible documentation encourages Debian users to access the Ubuntu repository to obtain Ansible. You need to add the following line to /etc/apt/sources.list:
deb http://ppa.launchpad.net/ansible/ansible/ubuntu trusty main
You can then install the software using the following commands:
$ sudo apt-get update
$ sudo apt-get install ansible
The Parabola GNU/Linux-libre distribution is a derivative of Arch Linux, without the binary blobs. You can install Ansible using the pacman utility:
$ pacman -S ansible
The latest Ansible version 2.2 (as of date) is what we will use in this article. Ansible is also available for BSD variants, Mac OS X, and Windows. You are encouraged to refer to the Ansible documentation for more information.
Virtualisation
Ansible can be used to provision new machines and also configure them. Instead of using bare metal machines, you can create multiple Virtual Machines (VMs) on your system. Lots of Free and Open Source Software (F/OSS) virtualization software is available.
QEMU is a machine emulator and virtualiser. It can also use host CPU support to run guest VMs for better performance. It is written by Fabrice Bellard, and released under the GNU General Public License (GPL). You can install it on Parabola GNU/Linux-libre, using the following command:
$ sudo pacman -S qemu
KVM or Kernel-based Virtual Machine (KVM) has direct support in the Linux kernel. It requires hardware support to be able to run guest operating systems. It is written in C, and is released under the GNU General Public License.
You need to check if your hardware first supports KVM. The ‘lscpu’ command will show an entry for ‘Virtualization’ if there is hardware support. For example:
$ lscpu

Architecture:          x86_64
CPU op-mode(s):        32-bit, 64-bit
Byte Order:            Little Endian
CPU(s):                4
On-line CPU(s) list:   0-3
Thread(s) per core:    2
Core(s) per socket:    2
Socket(s):             1
NUMA node(s):          1
Vendor ID:             GenuineIntel
CPU family:            6
Model:                 78
Model name:            Intel(R) Core(TM) i5-6200U CPU @ 2.30GHz
Stepping:              3
CPU MHz:               2275.341
CPU max MHz:           2800.0000
CPU min MHz:           400.0000
BogoMIPS:              4801.00
Virtualization:        VT-x
L1d cache:             32K
L1i cache:             32K
L2 cache:              256K
L3 cache:              3072K
NUMA node0 CPU(s):     0-3
Flags:                 fpu vme de pse tsc msr pae mce cx8 apic sep mtrr pge mca cmov pat pse36 clflush dts acpi mmx fxsr sse sse2 ss ht tm pbe syscall nx pdpe1gb rdtscp lm constant_tsc art arch_perfmon pebs bts rep_good nopl xtopology nonstop_tsc aperfmperf eagerfpu pni pclmulqdq dtes64 monitor ds_cpl vmx est tm2 ssse3 sdbg fma cx16 xtpr pdcm pcid sse4_1 sse4_2 x2apic movbe popcnt tsc_deadline_timer aes xsave avx f16c rdrand lahf_lm abm 3dnowprefetch epb intel_pt tpr_shadow vnmi flexpriority ept vpid fsgsbase tsc_adjust bmi1 avx2 smep bmi2 erms invpcid mpx rdseed adx smap clflushopt xsaveopt xsavec xgetbv1 xsaves dtherm ida arat pln pts hwp hwp_notify hwp_act_window hwp_epp
You can also check the /proc/cpuinfo output as shown below:
$ grep -E "(vmx|svm)" --color=always /proc/cpuinfo

flags		: fpu vme de pse tsc msr pae mce cx8 apic sep mtrr pge mca cmov pat pse36 clflush dts acpi mmx fxsr sse sse2 ss ht tm pbe syscall nx pdpe1gb rdtscp lm constant_tsc art arch_perfmon pebs bts rep_good nopl xtopology nonstop_tsc aperfmperf eagerfpu pni pclmulqdq dtes64 monitor ds_cpl vmx est tm2 ssse3 sdbg fma cx16 xtpr pdcm pcid sse4_1 sse4_2 x2apic movbe popcnt tsc_deadline_timer aes xsave avx f16c rdrand lahf_lm abm 3dnowprefetch epb intel_pt tpr_shadow vnmi flexpriority ept vpid fsgsbase tsc_adjust bmi1 avx2 smep bmi2 erms invpcid mpx rdseed adx smap clflushopt xsaveopt xsavec xgetbv1 xsaves dtherm ida arat pln pts hwp hwp_notify hwp_act_window hwp_epp
The Libvirt project provides APIs to manage guest machines on KVM, QEMU and other virtualisation software. It is written in C, and is released under the GNU Lesser GPL. The Virtual Machine Manager (VMM) provides a graphical user interface for managing the guest VMs and is written in Python.
You can install all this software on Parabola GNU/Linux-libre using the following command:
$ sudo pacman -S libvirt virt-manager
A screenshot of Virtual Machine Manager is provided below:

Check your distribution documentation to install the appropriate virtualisation software packages.
You can use the VMM to create a new virtual machine, and install a GNU/Linux distribution using an .iso image. You can specify RAM, disk size and follow the installation steps for your particular distro. You can also import an existing .qcow2 disk image to use it as a virtual machine.
Ansible with libvirt-VM
The version of Ansible used for this article is given below:
$ ansible --version

ansible 2.2.1.0
  config file = /etc/ansible/ansible.cfg
  configured module search path = Default w/o overrides
If you have the sshd daemon running on your local machine, you can use Ansible to test it. For example, a ping test on the localhost is shown below:
$ ansible localhost -m ping

localhost | SUCCESS => {
    "changed": false,
    "ping": "pong"
}
You can also check how long the system has been up and running using the following command:
$ ansible localhost -a uptime

localhost | SUCCESS | rc=0 >>
 11:00:20 up  4:09,  0 users,  load average: 0.18, 0.14, 0.11
You can execute a shell command on the remote machine (localhost, in this case) as illustrated below:
$  ansible localhost -a "date"

localhost | SUCCESS | rc=0 >>
Sun Feb  5 11:24:53 IST 2017
The ‘setup’ command provides details of the remote target machine. A snippet output is provided below:
$  ansible localhost -m setup

localhost | SUCCESS => {
    "ansible_facts": {
        "ansible_all_ipv4_addresses": [
            "192.168.10.1",
            "192.168.5.6"
        ],
        "ansible_all_ipv6_addresses": [
            "fe90::fc24:ff:feb9:cb61",
            "ff80::5846:fac1:6afc:2e30"
        ],
        "ansible_architecture": "x86_64",
        "ansible_bios_date": "06/12/2016",
        "ansible_bios_version": "R00ET45W (1.20 )",
        "ansible_cmdline": {
            "BOOT_IMAGE": "/vmlinuz-linux-libre",
            "cryptdevice": "/dev/sda1:cryptroot",
            "quiet": true,
            "root": "/dev/mapper/cryptroot",
            "rw": true
        },
        ....
An Ubuntu 15.04 instance with VMM is used in the following examples with Ansible. The IP address of the instance is added to /etc/hosts:
192.168.122.250 ubuntu
The /etc/ansible/hosts file contains the following:
ubuntu
You can now do a ping test from the host to the Ubuntu VM using the following command sequence for the user ‘xetex’:
$  ansible ubuntu -m ping -u xetex --ask-pass
SSH password:
ubuntu | SUCCESS => {
    "changed": false,
    "ping": "pong"
}
To avoid prompting for the password, you can add the localhost public SSH key to the VM, as follows:
$  ssh-copy-id -i ~/.ssh/id_rsa.pub xetex@ubuntu

/usr/bin/ssh-copy-id: INFO: Source of key(s) to be installed: "/home/user/.ssh/id_rsa.pub"
/usr/bin/ssh-copy-id: INFO: attempting to log in with the new key(s), to filter out any that are already installed
/usr/bin/ssh-copy-id: INFO: 1 key(s) remain to be installed -- if you are prompted now it is to install the new keys
xetex@ubuntu's password:

Number of key(s) added: 1
Now try logging into the machine, with ssh xetex@ubuntu and check to make sure that only the key you wanted was added.
You can now issue the following command to get the same result:
$ ansible ubuntu -m ping -u xetex

ubuntu | SUCCESS => {
    "changed": false,
    "ping": "pong"
}
For the Ubuntu system, you can also add the defined user in the /etc/ansible/hosts file as follows:
ubuntu ansible_ssh_host=ubuntu ansible_ssh_user=xetex
The ping command is now simplified to:
$  ansible ubuntu -m ping

ubuntu | SUCCESS => {
    "changed": false,
    "ping": "pong"
}
You can now try the earlier Ansible commands on the target Ubuntu VM as illustrated below:
$ ansible ubuntu -a uptime

ubuntu | SUCCESS | rc=0 >>
 12:32:14 up 25 min,  3 users,  load average: 0.02, 0.07, 0.06

$ ansible ubuntu -a date

ubuntu | SUCCESS | rc=0 >>
Sun Feb  5 12:32:45 IST 2017

$  ansible ubuntu -m setup
ubuntu | SUCCESS => {
    "ansible_facts": {
        "ansible_all_ipv4_addresses": [
            "192.168.122.250"
        ],
        "ansible_all_ipv6_addresses": [
            "ff20::5034:ff:fa9f:6123"
        ],
        "ansible_architecture": "x86_64",
        "ansible_bios_date": "04/01/2014",
        "ansible_bios_version": "1.10.1-20151022_124906-anatol",
        "ansible_cmdline": {
            "BOOT_IMAGE": "/boot/vmlinuz-3.19.0-15-generic",
            "quiet": true,
            "ro": true,
            "root": "UUID=f43c2c72-5bc7-4a97-9a43-12e634ae232af",
            "splash": true,
            "vt.handoff": "7"
        },
        ...
August 11, 2017
I have installed and configured StumpWM (v1.0.0) on Parabola GNU/Linux-libre. StumpWM is a keyboard driven, tiling Window Manager written in Common Lisp (CL). It is thus very hackable, and you can customize its configuration by writing Lisp code and reload it dynamically. The installation and configuration steps are provided below for reference.
Firstly, the Steel Bank Common Lisp (SBCL) compiler needs to be installed on the system using Pacman.
$ sudo pacman -S sbcl
$ sudo pacman -S acpi xtrlock emacs mate-terminal iceweasel
The acpi utility is installed to show the battery status in the modeline. The xtrlock utility is used to lock the screen. When the screen is locked, you will need to enter your user password to unlock the same. GNU Emacs, Iceweasel and Mate-terminal software packages are also installed. Quicklisp is a package manager for Common Lisp and is used to install the StumpWM dependencies with SBCL.
An installation directory is created at ~/downloads/quicklisp, and the quicklisplisp file is fetched as follows:
$ mkdir ~/downloads/quicklisp
$ cd ~/downloads/quicklisp
$ curl -O https://beta.quicklisp.org/quicklisp.lisp
The quicklisp.lisp file is loaded using the SBCL interpreter. The installation steps and output are shown below:
~/downloads/quicklisp $ sbcl --load quicklisp.lisp

    This is SBCL 1.3.17, an implementation of ANSI Common Lisp.
    More information about SBCL is available at <http://www.sbcl.org/>.

    SBCL is free software, provided as is, with absolutely no warranty.
    It is mostly in the public domain; some portions are provided under
    BSD-style licenses.  See the CREDITS and COPYING files in the
    distribution for more information.

      ==== quicklisp quickstart 2015-01-28 loaded ====

        To continue with installation, evaluate: (quicklisp-quickstart:install)

        For installation options, evaluate: (quicklisp-quickstart:help)

* (quicklisp-quickstart:install)

    ; Fetching #<URL "http://beta.quicklisp.org/client/quicklisp.sexp">
    ; 0.82KB
    ==================================================
    838 bytes in 0.00 seconds (0.00KB/sec)
    ; Fetching #<URL "http://beta.quicklisp.org/client/2017-03-06/quicklisp.tar">
    ; 250.00KB
    ==================================================
    256,000 bytes in 0.16 seconds (1602.56KB/sec)
    ; Fetching #<URL "http://beta.quicklisp.org/client/2015-09-24/setup.lisp">
    ; 4.94KB
    ==================================================
    5,054 bytes in 0.00 seconds (0.00KB/sec)
    ; Fetching #<URL "http://beta.quicklisp.org/asdf/2.26/asdf.lisp">
    ; 194.07KB
    ==================================================
    198,729 bytes in 0.09 seconds (2086.79KB/sec)
    ; Fetching #<URL "http://beta.quicklisp.org/dist/quicklisp.txt">
    ; 0.40KB
    ==================================================
    408 bytes in 0.00 seconds (0.00KB/sec)
    Installing dist "quicklisp" version "2017-07-25".
    ; Fetching #<URL "http://beta.quicklisp.org/dist/quicklisp/2017-07-25/releases.txt">
    ; 372.80KB
    ==================================================
    381,744 bytes in 0.15 seconds (2485.31KB/sec)
    ; Fetching #<URL "http://beta.quicklisp.org/dist/quicklisp/2017-07-25/systems.txt">
    ; 241.23KB
    ==================================================
    247,022 bytes in 0.10 seconds (2297.45KB/sec)

      ==== quicklisp installed ====

        To load a system, use: (ql:quickload "system-name")

        To find systems, use: (ql:system-apropos "term")

        To load Quicklisp every time you start Lisp, use: (ql:add-to-init-file)

        For more information, see http://www.quicklisp.org/beta/

    NIL

* (ql:add-to-init-file)

    I will append the following lines to #P"/home/guest/.sbclrc":

      ;;; The following lines added by ql:add-to-init-file:
      #-quicklisp
      (let ((quicklisp-init (merge-pathnames "quicklisp/setup.lisp"
                                             (user-homedir-pathname))))
        (when (probe-file quicklisp-init)
          (load quicklisp-init)))

    Press Enter to continue.

    #P"/home/guest/.sbclrc"

* (ql:quickload "clx")

    To load "clx":
      Install 1 Quicklisp release:
        clx
    ; Fetching #<URL "http://beta.quicklisp.org/archive/clx/2017-06-30/clx-20170630-git.tgz">
    ; 452.92KB
    ==================================================
    463,786 bytes in 0.12 seconds (3806.02KB/sec)
    ; Loading "clx"
    [package xlib]....................................
    ..................................................
    ..................................................
    ..................................................
    ..................................................
    ..................................................
    ..................................................
    ..................................................
    [package xlib/glx]................................
    [package xlib/gl].................................
    [package xlib/dpms]...............................
    [package xlib/xtest]..............................
    [package xlib/xinerama]...........................
    [package xlib-demo/clclock].......................
    [package xlib-demo/clipboard].....................
    [package xlib-demo/demos].........................
    [package xlib-demo/gl-test].......................
    [package xlib-demo/mandel].............
    ("clx")

* (ql:quickload "cl-ppcre")

    To load "cl-ppcre":
      Install 1 Quicklisp release:
        cl-ppcre
    ; Fetching #<URL "http://beta.quicklisp.org/archive/cl-ppcre/2015-09-23/cl-ppcre-2.0.11.tgz">
    ; 156.08KB
    ==================================================
    159,829 bytes in 0.08 seconds (1903.45KB/sec)
    ; Loading "cl-ppcre"
    [package cl-ppcre]................................
    ................
    ("cl-ppcre")

* (ql:quickload "alexandria")

    To load "alexandria":
      Install 1 Quicklisp release:
        alexandria
    ; Fetching #<URL "http://beta.quicklisp.org/archive/alexandria/2017-06-30/alexandria-20170630-git.tgz">
    ; 49.97KB
    ==================================================
    51,168 bytes in 0.04 seconds (1135.65KB/sec)
    ; Loading "alexandria"
    [package alexandria.0.dev].......................
    ("alexandria")

* (exit)

~/downloads/quicklisp $
The StumpWM v1.0.0 sources are fetched to ~/downloads/stumpwm directory, extracted and compiled using the following steps:
$ mkdir ~/downloads/stumpwm
$ cd ~/downloads/stumpwm
$ wget https://github.com/stumpwm/stumpwm/archive/1.0.0.tar.gz
$ tar xzvf 1.0.0.tar.gz
$ cd stumpwm-1.0.0/
$ ./autogen.sh
$ ./configure
$ make
You can then install the built stumpwm binary, which will get copied to /usr/local/bin/stumpwm as shown below:
$ sudo make install

$ which stumpwm
/usr/local/bin/stumpwm
I use the Lightweight X11 Display Manager (lxdm), and thus created a /usr/share/xsessions/stumpwm.desktop file to login to StumpWM from the login manager:
[Desktop Entry]
Encoding=UTF-8
Name=StumpWM
Comment=StumpWM
Exec=/usr/local/bin/stumpwm
Type=Application
A sample ~/.stumpwmrc configuration file is given below (should be self-explanatory):
;; -*-lisp-*-

(in-package :stumpwm)

;; Startup message: display the machine's name
(setf *startup-message* (machine-instance))

;; Turn on the modeline
(if (not (head-mode-line (current-head)))
    (toggle-mode-line (current-screen) (current-head)))

;; Lock screen
(define-key *root-map* (kbd "L") "exec xtrlock")

;; I like messages to be centered on the screen.
(setf *message-window-gravity* :center)
(setf *input-window-gravity* :center)

;; I thought that this mode-line was fabulous!
(defvar *battery-status-command*
  "acpi -b | awk -F '[ ,]' '{printf \"%s%s\", $3, $5}' | sed s/Discharging/\-/ | sed s/Unknown// | sed s/Full// | sed s/Charging/+/")

(defvar *vol-status-command*
  "amixer get Master | grep \"[[:digit:]]\\+%\" -o | tr -d \"\\n\"")

(setf *screen-mode-line-format*
      (list "%w [^B%n^b] ^>"
      '(:eval (run-shell-command *battery-status-command* t))
      " | Vol. "
      '(:eval (run-shell-command *vol-status-command* t))
      " | %d"))

;; urxvt
(define-key *root-map* (kbd "c")
  "exec urxvt +sb -fn \"xft:Ubuntu Mono:pixelsize=15,style=regular\"")

;; Window information format
(setf *window-info-format* "%wx%h %n (%t - %c)")

;; Window format
(setf *window-format* "%m%n%s%10t")

;; Emacs
(defvar *emacs-command* nil
  "Start an emacs client frame. Starts an emacs daemon if necessary.")
(setf *emacs-command* "bash -c -i 'emacsclient -c -a \"\"'")

(define-key *root-map* (kbd "e") "run-emacs")

(defcommand run-emacs () ()
    (run-shell-command (concat "exec " *emacs-command*)))

;; iceweasel
(defcommand iceweasel-browser () ()
  "run iceweasel"
  (run-or-raise "iceweasel" '(:instance "iceweasel")))
(define-key *root-map* (kbd "b") "iceweasel-browser")

;; mate-terminal
(defcommand mate-terminal () ()
  (run-or-raise "mate-terminal --hide-menubar" '(:class "mate-terminal")))

(define-key *root-map* (kbd "C") "mate-terminal")

;; Clear rules
(clear-window-placement-rules)

(define-frame-preference "Default"
  ;; frame raise lock (lock AND raise == jumpto)
  (0 t   t :instance "emacs")
  (1 t   t :instance "iceweasel-browser"))

;; dvorak and தமிழ்
(stumpwm:run-shell-command "sh -c 'setxkbmap us,in dvorak,tam_unicode grp:ctrls_toggle'")

;; Start default applications
(run-emacs)
(iceweasel-browser)
On logging into StumpWM, GNU Emacs and Iceweasel browser are opened automatically. I also switch between English and Tamil keyboard layouts when required, and the two Control keys are used to toggle between them. A StumpWM screenshot is shown below:

You are encouraged to read the StumpWM manual to know more about its usage and configuration.
July 5, 2017
I had organized a one-day workshop based on my book i want 2 do project. tell me wat 2 do at reserved-bit, Pune on Saturday, June 3, 2017. Thanks to Nisha Poyarekar and Siddhesh Poyarekar for providing their makerspace as venue for the workshop.
The objective of the workshop is to share the methodology and best practices on working with Free and Open Source Software projects, and also to guide the participants on career options. Although there is plenty of free documentation (including my own) available on the subject, some people prefer a formal, systematic approach to learning in a private coaching environment. Hence, this workshop is tailored for the same and is made a paid workshop, similar to personal tutoring.
The book has been in circulation for many years. So, I had to give two options - pay only for the workshop, or pay for both the workshop and the book (if they have not already bought the book). I have also kept additional copies of my book at the reserved-bit makerspace if people are interested. I had covered the following topics:
- Careers with F/OSS
- “i want 2 do project. tell me wat 2 do” best practices
- Introduction to Git
- Hands-on problem solving exercises
- Real-world project example
- Goal-driven development
The feedback has been positive and I am sharing the same below:


If you are interested in attending such a workshop, do write to me: author at shakthimaan dot com.
June 20, 2017
Introduction
I attended Rootconf 2017 on May 11-12, 2017 at MLR Convention Centre, JP Nagar, Bengaluru.

The event had two parallel tracks, the Rootconf track at the main conference hall, and the DevConf.in track sponsored by Red Hat. A number of infrastructure hosting companies had sponsored the event. The selected talks had good diversity with topics ranging from monitoring, databases, networking, security etc.
Day I
The day’s proceedings began with the talk on the “State of open source monitoring landscape” by Bernd Erk. He gave a good overview of the available monitoring tools. He is involved in the Icinga2 project, which is re-written in C++ for performance. It is an alternative for the Nagios tool.
Aditya Patawari then provided an introduction to Kubernetes with a demo, as Spencer Krum could not make it to his talk on the “Anatomy of an alert”. After a short break, I attended “A little bot for big cause” session by Pooja Shah. The talk basically demonstrated how to create a bot by integrating various APIs.
I attended Manan Bharara’s talk on “Monitoring performance critical applications” where he had explained how they had used Clojure for monitoring at Otto in Germany. The presentation was very good, and the Oscillator Clojure code is available. He had provided good illustrations and code snippets in his presentation.
A number of stalls were available in the hallway, and I spent considerable time talking with the sponsors. At the Red Hat stall, I learnt some of the features and use cases for the Foreman provisioning tool. I was pictured with the Foreman helmet:

After lunch, I attended “SELinux: A deep dive” by Rejy M Cyriac. He gave an excellent introduction to SELinux, explaining the underlying concepts and rationale for the same. We also did basic hands-on exercises, but, I could not attend the last section as I had to move to the main conference hall for the flash talks. I sang the Nursery Rhymes version for DevOps. The video is available.
We then headed to the Rootconf party sponsored by Go-Jek!
Day II
The second day started with the talk by Kunal Grover on “Failure resilient architecture with microservice dependencies”. He presented the ways by which disruptions are performed in cloud infrastructure and how recovery mechanisms are tested. Ramya A then gave an interesting talk on “Asynchronous integration tests for microservices”. She had explained the pact.io family of frameworks to support Consumer Driven Contracts testing. Laxmi Nagarajan then gave a high level overview of “Capacity planning for AWS and configuring AWS autoscaling policies” sharing her Industry experience. After a short break, Colin Charles presented his story on “Capacity planning for your data stores” citing real world examples.
I then moved to the DevConf.in track to attend Ruchi Singh’s talk on “Migration of 300 microservices from AWS cloud to Snapdeal cloud”. The time was too short for such a talk, and it was an overview. I would have liked to see more details, given that they use Chef for provisioning and handle more than 16 TB of data as mentioned by Ruchi Singh.
After a quick lunch, I attended “Adventures in Postgres management” by Ramanan Balakrishnan. It was a good technical talk going over the failures and experiences learnt. After the talk I went to the hallway to listen to the Off-The-Record (OTR) session on mistakes to avoid when planning your infrastructure.

I returned to the main conference hall for doing some stretching exercises. In my opinion, all conferences should make this session mandatory, especially after you have been sitting for a long period of time. This session was then followed by the “Working with Secrets” talk by Shrey Agarwal, who gave an overview of using Hashicorp’s Vault for managing passwords. It was a very short introduction on the topic.
After a short beverage break, Toshaan Bharvani presented “Living with SELinux”, which was an excellent presentation on the subject. The initial slides had some material that Rejy M Cyriac had introduced the previous day, but, the content and presentation were good. With proper SELinux policies, he said that root in his production servers cannot do much. Rejy and Toshaan both asked people to use permissive mode instead of disabling SELinux altogether, so that you at least know what is being audited.
The last talk of the day was by Anurag Bhatia on “Understanding eyeball routing via RIPE Atlas”. He gave an overview of the RIPE Atlas project and how network metrics are measured and monitored wherever the RIPE device is installed. It is a TP-Link hardware whose firmware can be flashed using Libre software. Unfortunately, at this point the source of the firmware is not released as Free and Open Source Software. I was told that there is still an ongoing discussion on the same.
Conclusion
The talk by Manan Bharara and Rejy’s SELinux workshop were the highlights for day one for me. The content on the second day was much better and had greater depth in my opinion. Overall, it was a useful technical conference, and a good place to meet like-minded people.
I would like to thank Aerospike for sponsoring me to attend the conference.